No products in the cart.
April 4, 2025
🏗️ How To Build A Foundation
A solid foundation is the key to a long-lasting shed. At Outdoor Living Today, we want to help you create a sturdy, level base for your shed—without confusion or guesswork. Whether you’re a DIY pro or first-timer, this guide walks you through clear, step-by-step instructions and multiple foundation options.
Three Recommended Foundation Types:
- Patio Stones (Fast & Easy)
- Pressure-Treated 4×4 Beams (Durable & Elevated)
- Concrete Slab (Permanent & Weather-Resistant)
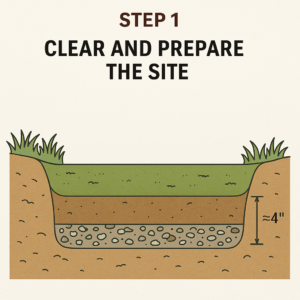
 STEP 1: Clear & Prepare the Site
Before your shed kit arrives:
Remove grass, debris, roots, and rocks.
Make sure the area is flat and drains well.
The ground should slope away from the site (approx. 1/8″ per foot over 10 feet) to prevent water buildup.
For best results, excavate 4 inches and fill with gravel or crushed rock.
💡 Pro Tip: Use a landscape fabric under gravel to prevent weed growth and soil shifting over time.
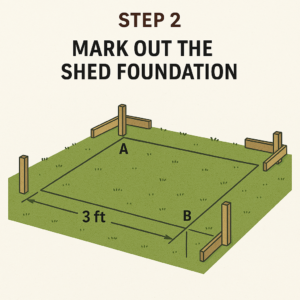
 STEP 2: Mark Out the Shed Foundation
Pick one corner (Point A) and drive a stake into the ground.
Use the 3-4-5 triangle method (based on the Pythagorean theorem) to ensure your layout is square—this method works for any shed size:
Measure 3 feet (or any multiple) on one side, and 4 feet (or same multiple) on the adjacent side. The diagonal between them should be exactly 5 feet (or the matching multiple).
For larger sheds, you can use 6-8-10 or 9-12-15—just maintain the ratio.
Once your corners are square, outline the full perimeter using string and batter boards.
📏 Need help squaring? There are apps and online calculators that can assist with right angles using your shed dimensions.
STEP 3: Choose Your Foundation Type
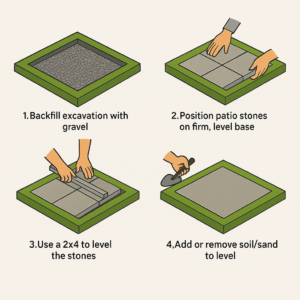
Patio Stone Foundation
Best for small to medium sheds on stable ground.
Level the soil or gravel, then place stones under key floor joist points (see your floor plan).
Adjust using sand or soil for leveling.
Space stones evenly to support the shed’s perimeter and any internal floor joists for balanced weight distribution.
Use a long 2×4 and a carpenter’s level to ensure all stones sit flat and level across the entire footprint.
✅ Quick to install, affordable, and easy to move or adjust.
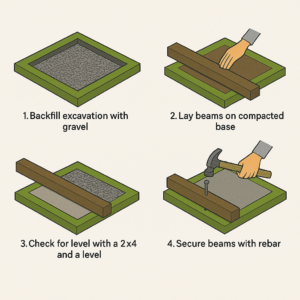 4×4 Pressure-Treated Beam Foundation
Ideal for slightly uneven terrain or areas where airflow is needed beneath the shed.
Lay beams perpendicular to joists on a gravel base.
Use rebar (½”) driven through pre-drilled holes to secure beams in place.
Leave space between beams to promote drainage and prevent moisture buildup under the shed.
Ensure all beams are level and aligned before attaching floor joists for a stable, even base.
🪵 Leaves room underneath for ventilation and helps prevent rot.
Best for large, heavy-duty sheds or long-term placement.
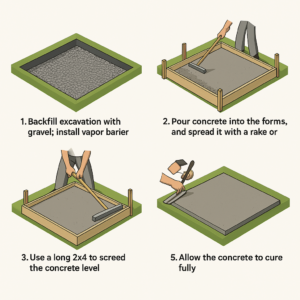
Excavate 6 inches: 4″ of gravel, 4″ of concrete slab.
Include a plastic vapor barrier between gravel and slab.
Frame your pour with 2x4s, level and finish with a trowel or bull float.
🔒 Most permanent option. Offers unbeatable durability and pest resistance.
⚠️ Final Tips Before You Start:
Always check local building codes and permit requirements.
Call your local utility provider before you dig to avoid underground lines.
Don’t skip drainage—it’s your best defense against rot and frost heave.
🔍 Need More Specific Foundation Guidance?
While this guide provides general best practices for preparing a foundation, individual product designs may have unique requirements. For a more tailored guide for your specific model, please refer to the provided product assembly manual included with your kit or available above .
April 4, 2025
-
 On SaleSale!%Off19Save $1,8201820$19%1820$On SaleSale!%Off19Save $1,8201820$19%1820$
 -
 On SaleSale!%Off26Save $2,7252725$26%2725$On SaleSale!%Off35Save $3,8753875$35%3875$On SaleSale!%Off20Save $2,4252425$20%2425$On SaleSale!%Off35Save $3,8753875$35%3875$
 -
 On SaleSale!%Off14Save $1,4101410$14%1410$On SaleSale!%Off14Save $1,4101410$14%1410$
 -
 On SaleSale!%Off11Save $635635$11%635$On SaleSale!%Off10Save $665665$10%665$On SaleSale!%Off6Save $375375$6%375$On SaleSale!%Off11Save $665665$11%665$
 -
 On SaleSale!%Off18Save $485485$18%485$On SaleSale!%Off18Save $485485$18%485$On SaleSale!%Off9Save $255255$9%255$On SaleSale!%Off23Save $555555$23%555$On SaleSale!%Off23Save $555555$23%555$
 -
 On SaleSale!%Off15Save $1,9081908$15%1908$On SaleSale!%Off18Save $2,1052105$18%2105$On SaleSale!%Off17Save $1,8751875$17%1875$On SaleSale!%Off18Save $2,1052105$18%2105$

